

How to Safely Buy Web Assets and Point Your Domain Name to a Web Hosting Server

Acquiring high-value digital real estate and configuring its core server routing are the two most critical foundational milestones when deploying an enterprise web presence. Yet, many founders treat domain procurement and DNS provisioning as minor administrative tasks. This technical oversight leaves growing brands exposed to domain hijacking, configuration errors, prolonged network downtime, and catastrophic search engine indexing penalties. Securing your digital assets and establishing an optimized network pipeline requires a deep comprehension of domain name system architecture, registrar security protocols, and server infrastructure.
When your underlying infrastructure is misconfigured, even the most expensive visual design assets will fail to load efficiently, driving potential clients directly to your market rivals. Every step in this migration and setup lifecycle must be executed with absolute precision. From verifying premium aftermarket domain history to setting up zone files and minimizing global propagation delays, executing a clean deployment prevents operational vulnerabilities. It ensures your digital platform is engineered to handle massive commercial traffic spikes from day one.
Secure Acquisition of Digital Domain Assets
The procurement phase extends far beyond finding an available phrase and entering corporate credit card details. A domain name is a core corporate asset that requires institutional-grade protection at the registrar level. When choosing a primary domain registrar, look for enterprise-level platforms that offer advanced security configurations. Avoid low-tier consumer registrars that bundle aggressive marketing upsells while obscuring critical security features behind premium paywalls. A professional domain management platform must provide multi-factor authentication via hardware cryptographic keys, strict IP address access restrictions, registry locking mechanisms, and comprehensive account access logging.
If you are acquiring a premium domain name on the secondary aftermarket from a third-party seller, never send capital directly to the individual. Use a reputable, neutral digital escrow service to broker the transaction securely. The escrow system holds your capital until the domain control authority is completely transferred into your corporate registrar account, verified by ICANN, and cleared of any legacy administrative holds or legal disputes. This prevents common transfer scams where a seller retains control of the asset after receiving payment.
Checking Historic Domain Liability
Before finalizing the purchase of an existing or expired domain, you must conduct extensive historical due diligence. Domains can carry severe algorithmic penalties from search engines due to past spam violations, black-hat search engine optimization manipulation, or malicious software hosting. Review historical internet archive databases to see what type of business was previously hosted on the URL.
Check the link profile history using professional diagnostic indexing platforms to ensure there are no toxic or automated backlink arrays pointing to the domain. A domain name saddled with a toxic backlink profile can severely hinder your organic visibility before you even publish your first page of custom content. If a domain was previously used to distribute low-quality web assets, cleaning up its reputation requires an extensive, time-consuming reconsideration process with search engines. Choosing a clean extension and verifying its historical record is a non-negotiable prerequisite for online credibility.
Building on a trusted foundation saves months of technical remediation. For an in-depth strategy on selecting names that maximize organic brand authority, read our comprehensive guide on how to choose a brand name with an available .Com domain that builds buyer trust.
Registrar Security Configuration Checklist
To safeguard your newly acquired digital assets from unauthorized transfer requests, data leaks, or social engineering attacks, execute these essential security configurations immediately inside your registrar dashboard:
- Enable Time-Based One-Time Password (TOTP) or hardware-token Multi-Factor Authentication across all corporate administrative accounts.
- Implement a strict Registry Lock or Registrar Lock status to completely block unauthorized Extensible Provisioning Protocol (EPP) transfer requests.
- Activate comprehensive WHOIS Privacy protection to obscure private corporate ownership details, minimizing targeted phishing attempts.
- Configure a dedicated, isolated corporate security email address for domain notifications that operates independently of the primary domain name.
- Disable any automated domain marketplace listings or external broker assessment features provided by default by your registrar.
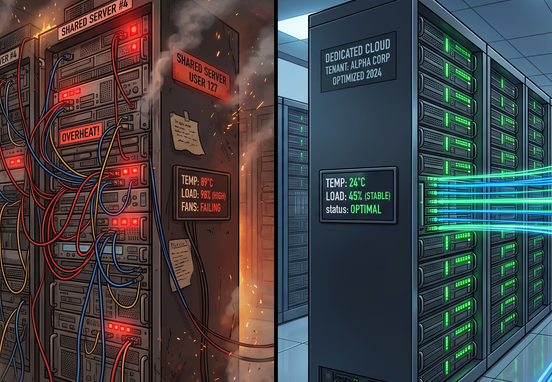
Selecting an Infrastructure-First Hosting Server
A domain name is simply a pointer; it requires a high-performance server environment to process visitor requests and render your application files. Choosing an unoptimized hosting layer introduces systemic speed constraints that frontend code optimization cannot fully resolve. Shared hosting solutions, while cost-effective for small-scale operations, represent a major operational liability for a growing company.
In a shared server environment, hundreds of unrelated websites pool the same CPU, RAM, and network interface card resources. If a single site on that machine experiences a sudden traffic spike or suffers a severe security breach, every other site on that physical machine experiences immediate resource depletion, causing slow page loading times or total system failure. Reviewing the hidden operational expenses of mass-market DIY web builders reveals exactly how these budget platforms compromise your bottom line compared to dedicated enterprise setups.
Evaluating Hosting Framework Options
For modern business operations, your infrastructure choices generally come down to Virtual Private Servers, Dedicated Hardware, Managed Bare-Metal Cloud environments, or distributed edge systems. The table below outlines the clear distinctions between these primary hosting methodologies:
| Server Architecture Type | Resource Isolation | Scalability Velocity | Optimal Use Case Scenario |
|---|---|---|---|
| Shared Server Hosting | Zero Isolation (Shared Pool) | Very Restrictive | Temporary staging environments or low-traffic personal projects. |
| Virtual Private Server (VPS) | Software-Isolated Resources | Moderate (Manual Upgrades) | Mid-Market B2B platforms requiring dedicated root access control. |
| Managed Bare-Metal Cloud | Hardware-Isolated Environments | Instantaneous (Auto-Scaling) | High-Traffic enterprise domains and transactional e-commerce nodes. |
| Headless Cloud Edge Networks | Fully Distributed Global Nodes | Infinite Elastic Scaling | Custom, hand-coded corporate web architecture maximizing global speed. |
If performance, local visibility, and absolute security are your primary business drivers, legacy shared infrastructure will consistently cap your operational potential. Understanding the hidden costs of DIY why free templates squarespace themes and wordpress limit growing businesses clearly demonstrates how low-tier setups restrict business growth and compromise technical efficiency.
The DNS Architecture Decoded
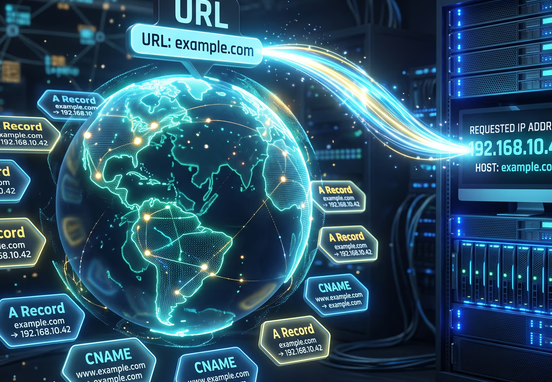
The Domain Name System functions as the routing directory of the global internet. It translates human-readable domain names into machine-readable Internet Protocol (IP) addresses, allowing web browsers to locate and fetch data from your server hardware. When a user enters your URL, a query is sent to a recursive DNS resolver, which communicates with authoritative nameservers to identify the exact IP address mapped to your domain. Managing this zone file with zero syntax errors is vital for maintaining consistent application uptime.
Crucial DNS Record Types Explained
To effectively point your domain name to a server, you must configure a series of specific alpha-numeric record types within your authoritative zone file:
- A Records: Maps your primary root domain to a specific 32-bit IPv4 address assigned by your web hosting provider.
- AAAA Records: Connects your domain name to a 128-bit IPv6 address, ensuring modern network compatibility.
- CNAME Records: Creates an alias that points a subdomain to another canonical domain name rather than a raw IP address.
- MX Records: Routes your corporate incoming email traffic to specified secure mail servers, managing communication pipelines.
- TXT Records: Holds human and machine-readable text data, used heavily for domain ownership validation and security frameworks.
+-------------------------------------------------------------+
|                 DNS ZONE ROUTING FLOW                       |
+-------------------------------------------------------------+
                               |
                       [ Incoming Query ]
                               |
     +-------------------------+-------------------------+
     |                         |                         |
     v                         v                         v
[ A / AAAA Records ]     [ CNAME Records ]        [ MX Records ]
Maps to Server IPs        Maps Subdomain Aliases   Maps Email Systems
(192.0.2.1 / IPv6)        (www -> root domain)     (mail.protonmail.ch)
     |                         |                         |
     v                         v                         v
[ Connects directly to ] [ Resolves to canonical ] [ Routes traffic to ]
[ Public Web Infra ]     [ Target Root Domain ]    [ Dedicated Mail Nodes]
Technical Step-by-Step: Pointing Your Domain
Connecting your domain name to your server infrastructure requires meticulous updates within the authoritative zone file. Follow this exact sequence to ensure an efficient, error-free deployment across the network.
Step 1: Document Your Destination Server Credentials
Log into your web server management portal or cloud console interface. Locate the public IPv4 address and the modern IPv6 address assigned to your specific virtual container or bare-metal environment. Copy these strings accurately, ensuring no trailing spaces or hidden characters are captured in your clipboard.
Step 2: Establish Your Authoritative Nameserver Authority
Decide whether you will utilize the registrar's default nameservers or migrate to an enterprise-grade Anycast DNS network provider. Moving your nameserver records to a highly distributed, performance-optimized edge network drastically lowers global lookup latencies. Update the NS records at your registrar to reflect your chosen edge infrastructure routing.
Step 3: Configure the Root Records
Access your active DNS zone management dashboard. Locate any pre-existing A or AAAA records pointing to placeholder landing pages or old hosting accounts. Edit the root record (often denoted by the "@" symbol) and swap out the old value for your new server's IPv4 address. Repeat this exact process for the modern IPv6 configuration.
Step 4: Map Subdomain Aliases and Standardize the Canonical URL
To ensure that visitors who type the "www" prefix arrive at your primary site without encountering SSL warnings or broken loops, configure a CNAME record. Set the host field to "www" and point its destination directly to your root domain name, keeping the system clean and unified.
Step 5: Adjust Time-to-Live Settings for Fast Propagation
The Time-to-Live (TTL) variable tells global network routers how long to cache your DNS record settings before checking back with the authoritative server for updates. If you are conducting a live site migration, lower your TTL to 300 seconds a day prior to the switch. This ensures your updates propagate globally in just five minutes, preventing prolonged offline windows.
Verifying DNS Configuration via Terminal Diagnostics
Once your records have been saved within the zone manager, avoid relying on basic online browser check utilities that display cached results. Instead, open your local machine's terminal interface and perform a direct lookup using diagnostic network tools. To query the active A records for your domain name directly from authoritative global resolution nodes, execute the following command string:
+-------------------------------------------------------+
|             TERMINAL DNS VERIFICATION FLOW            |
+-------------------------------------------------------+
                            |
         [ Run: dig companydomain.com A +short ]
                            |
                            v
           [ Query Global Resolution Nodes ]
                            |
         +------------------+------------------+
         |                                     |
         v                                     v
[ Returns New IPv4 Address ]         [ Returns Old IP / Blank ]
         |                                     |
         v                                     v
[ SUCCESS: Live Traffic Routed ]     [ ERROR: Cache Delay / Syntax Issue ]
+------------------------------+     +-----------------------------------+

Infrastructure Deployment and Speed Strategy
Pointing your domain to a functional server is only half the battle. If that destination server takes seconds to parse code, process database queries, or compile assets, your brand perception will deteriorate rapidly. Your system architecture must be fine-tuned to deliver exceptionally low Time to First Byte (TTFB) milestones across all geographical user locations.
Instead of deploying bogged web templates that burden your server with heavy processing tasks, select clean, modern development methodologies. Our engineered, high-performance web design and development service is built systematically around custom source code configurations. This approach eliminates server bloat, stabilizes Core Web Vitals, and ensures your infrastructure loads content almost instantly when the DNS handshake completes.
Security Hardening at the Edge Network Layer
A live network pipeline must be hardened immediately against common web threats. Leaving a freshly routed server open without activating security handshakes invites malicious actors to target your raw IP address. Your first operational mandate is the installation of a secure SSL/TLS certificate to establish a protected HTTPS connection link. Avoid manual configuration traps by utilizing automated management layers that handle validation checks and automated 90-day renewals seamlessly.
Implementing Essential Cybersecurity Protocols
To protect your brand reputation, user data, and search rankings, your server configuration must feature comprehensive, multi-layered defensive frameworks. Focus on these three foundational implementation steps:
- Enforce Universal HTTPS Redirection: Cancel all unencrypted HTTP port 80 traffic at the server configuration file level, systematically forcing all user requests over secure port 443.
- Deploy Domain Name System Security Extensions (DNSSEC): Protect your domain routing from cache poisoning and man-in-the-middle attacks by generating cryptographic signatures for your DNS records.
- Configure Advanced Email Security Records: Implement strict SPF, DKIM, and DMARC TXT configurations within your zone file to verify outgoing brand correspondence and eliminate email spoofing liabilities.
Infrastructure Optimization Tip: Never allow your primary server's raw, origin IP address to be exposed publicly in your DNS records if you are facing targeted attacks. Utilizing an edge network proxy hides your origin IP behind a protective structural shield, absorbing malicious traffic surges before they ever reach your core server.
Failing to establish a hardened server environment risks triggering prominent "Not Secure" privacy warnings within modern user browsers. For a granular breakdown on properly configuring encryption keys and managing origin certificates, read our tactical brief on bespoke cyber security infrastructure for founders and how to fix not secure ssl errors.
Validating Long-Term Architecture Stability
Maintaining a high-performing digital asset requires regular system health audits. Check your zone files periodically to remove obsolete validation records, verify that your server memory limits can handle traffic spikes, and ensure that your automated daily backup protocols run consistently. By decoupling your high-value digital assets from restrictive, cookie-cutter platform ecosystems and engineering a clean, direct pipeline between a highly secured registrar and custom-built, dedicated server infrastructure, you eliminate technical debt.
This sets up an optimized platform that functions flawlessly for your global user base. Investing the time to correctly build your foundational infrastructure pays massive dividends in technical execution, search console health, and operational resilience. When your underlying infrastructure runs on clean, customized source code, your company gains a permanent speed advantage. To see why this development philosophy outperforms standard platforms, review our insight on why clean hand-coded web architecture beats page builders for technical seo security ux and server efficiency.